

Learning Healthy Habits Through Meaningful Online Game Design
The first step to true learning is engagement. What better way to engage students these days than video games. That's right... we said video games. This Lesson plan will easily guide you through the process of how you can use meaningful online video game design to enhance students understanding of health eating, exercising and other healthy lifestyle choices (as well as enhance students science, math, language, technology, and career skills along the way).
You will start out learning how to make sure your school environment is prepared technology wise (easier than you think). Then you will discuss with students exactly what healthy eating, exercising and lifestyle choices are. After that you will be introduced to an easy to use online video game design website called Gamestar Mechanic. Do not be intimidated, this site is built for teachers and students with no game design or even game playing experience. After that you will learn how to publish students' games on the Green Ribbon Schools website, for the entire world to see. All of this can actually occur in less than 4-6 weeks (depending on your schedule).
So let's get started
Table of Contents
This Lesson Plan consists of 4 Major Sections and then the Steps within each. These are:
Section 1: Prepare the Environment and Get Healthivores Started on GRS!
| Step 1: | Technology Requirements (0-2 hours) |
| Step 2: | Teacher Registers on GRS if not already registered (5 minutes) |
| Step 3: | Teacher Must Start the "Healthivores" Project on GRS (5 minutes) |
Section 2: Discuss Healthy Eating, Exercise and Healthy Choices
Section 3: Develop the Games
Section 4: Green Ribbon Schools - let the world see it!
YOU ARE DONE! (once you Publish the Results page(s) including all of the requirements from the SUBMISSION CHECKLIST, the submission(s) is complete)

Section 1: Prepare the Environment and Get Healthivores Started on GRS!
Step 1: Technology Requirements: Computers, Browsers and Electricity (easier than you think) - 1 hour
- Computers - You will need approximately one computer for every 1-3 students. One computer per student is preferred so they can all complete the tutorials in SECTION 3: Step 3 at the same time. If you have a limited number of computers, go ahead and group the students into a group of 3 or more and have them complete the tutorials as a group
- Adobe Flash - All computers will need Adobe Flash (Version 10 or higher)
- Check your version here http://www.adobe.com/software/flash/about/ and look for the below box on the right side of the page:
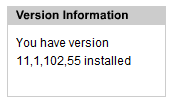
- If your version is lower than 10.0 update your Flash here: http://get.adobe.com/flashplayer/ (we recommend updating to Version 11 or higher)
- Internet - All computers will need internet access.
- Web Browsers - Be sure that your computers have an internet browser (Internet Explorer or Firefox). Be sure that the browser is updated on all computers. For best results use Firefox 8 or higher (a free browser that can be downloaded here: http://www.mozilla.org/en-US/firefox/new/ ).
Step 2: Teacher Registers on GRS if not already registered (5 minutes)
Visit www.greenribbonschools.org and click on the REGISTER button.
Step 3: Teacher Must Start the "Healthivores" Project on GRS (5 minutes) - START AN ACTIVITY - HOW TO VIDEO
To "Start" the Healthivores project on the Green Ribbon Schools website:
- Once logged in, click on the big red Start a New Project button
Start a New Project - Complete the "Start New Project" page. On this page, it is important that:
- In the Project Name blank, you must enter the word "Healthivores". (You may also include other words in the Project Name as long as "Healthivores" is included.)
- From the Cornerstone - Category pulldown, choose "Health & Fitness - Health Education".
- From Subcategory pulldown, choose "Healthivores VG Contest"
- In the Keywords blank, enter "AMD". (You may also include keywords that represent you organization, school or project as well - ex: AMD, TCEA, NSTA, gaming)
Section 2: Discuss Healthy Eating, Exercise and Healthy Choices
Step 1: Review the Health Resources provided in this Lesson Plan or collaborate with Health, PE and other teachers at your school (1 hour)
You as the teacher will review and research what healthy food, exercise and lifestyle choices are for you and the kids. We have provided suggested resources below or you may want to get together with the PE, Health, Science teacher, Nurse or other individual to make sure you are able to teach the concept. Keep it simple as you can get lost out there in all the books, articles, etc.
SUGGESTED RESOURCES (+):
Step 2: Discussions and Projects with Students Around Health (1-2 hours)
Spend at least 2 hours discussing and teaching students what healthy eating, exercising and lifestyle choices are. Here you are laying the foundation for the concepts they will put into their games. (i.e. Vegetables are nutritious and provide vitamins to help you stay healthy so you can do better in school and in sports. Foods high in sugar, like ice cream, can turn into fat and slow you down and make you sleepy.)
- Suggested Exercise - Before discussing healthy foods and choices, have students create a collage of what they eat for breakfast, lunch, snacks and dinner on a daily basis. Then after discussing healthy foods and choices have them paste pictures of healthy food alternatives over the unhealthy foods they were eating. This not only shows them what they have been eating but that they can easily eat an alternative that is tastier and much better for you.
Section 3: Develop the Video Games
You may use any game design program/website you wish (you must be able to share/embed the game using an html code). We provide Gamestar Mechanic as a user-friendly option for those with no game design experience.Step 1: Teacher Registration on Gamestar Mechanic website (5-30 minutes)
Visit this link (http://gamestarmechanic.com/teachers/get_started) and follow the below steps:
- On this page, you will locate and click on the "Use the Free Edition" button in the Use the Free Edition box (see image below):

(Note: If you wish, you can choose the Exclusive Educational Package offered on this page for a small fee per student.) - Complete the "Create a Teacher Account" and "Tell us about Your School" sections and click the "Validate User and Create Your Class" button.
- Complete the "Create Your Class" section and click the "Validate and Create Class" button.
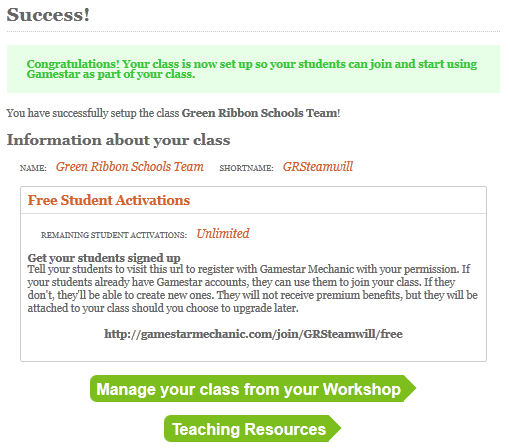
- Upon completion of these steps, you will see a page like the below, letting you know you have successfully registered and completed setting up your class on the Gamestar Mechanic website:
Step 2: Student Registration (30 min-1 hour)
- Now that you have set up your Class you will receive an email from Gamestar Mechanic with a Student Invite Link. Share this link with your students. They will follow that link and complete registration, connecting them to you and the class you set up.
If you lose your email from Gamestar Mechanic or it does not arrive, you can locate the Student Invite LINK by logging into your Gamestar account and clicking on WORKSHOP in the top navigation bar:

Then locate the "Classes" section on this page and click the "About My Institution" button:

Then locate the "Quick Join Links" section of this page and you will see the STUDENT link:

- Once your students have visited the Student Invite LINK you gave them and finished registration, they will click into the QUEST area of their account on Gamestar Mechanic. This will begin the Quest Tutorials on how to Design Games.
Step 3: Students Complete the Gamestar Mechanic Quest Tutorials (5 hours)
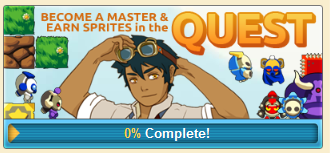
Once logged into the Gamestar Mechanic website, students will click on the QUEST button to enter the QUEST area of their account. Through the completion of the Quest, students will learn how to create video games and earn sprites/characters to use in their games. The Quest Tutorials are set up so that students can complete them at their own speed, and they require no instruction from the teacher to complete. They are:
- Lesson 1: Terms and Concepts - 1 hour
- Lesson 2: Core Design Elements - 1 hour
- Lesson 3: Balance - 1 hour
- Lesson 4: Design - 1 hour
- Lesson 5: Playtest and Iterate - 1 hour
HEALTHIVORE™ SPRITES: Your students can get a free package of exclusive Healthivore sprites/characters, to use in their game designs, by clicking on this link: http://gamestarmechanic.com/?activation=HGVAXUOKZA


If you're not already logged in to the Gamestar Mechanic website, it will ask you to do so. Once you've followed the link and logged in, you will get a confirmation message indicating that you know have access to the Healthy Sprites. When starting a game in the Workshop, you will now be able to use those sprites.
Step 4: Students are put into groups to Plan their Game (1-2 hours)
Put students into teams of 3 or less (max of 3 laptops will be awarded to students of winning team - See PRIZES). Students may also work individually if you prefer. Have the students plan what their game is going to be about and how they are going to put it together. Questions that should be answered during this pre game design planning phase are:
- Who is the audience: Other students and kids? Adults? Unhealthy people? etc.
- What healthy food, exercise and healthy lifestyle choices lesson do you want to teach in your game?
- What is the story behind your game? (Timmy needs to avoid the bad influencer guys who are trying to talk him into eating hamburgers and ice cream as he is trying to make it to the park to play football with his friends.) Another example: SAM the Super Antioxidant Man is fighting off free radicals inside of the human body. He collects the good fruits and vegetables that are high in antioxidants and shoots all the bad free radical guys. Here is a link to this game for reference: http://greenribbonschools.org/activity-detail.php?id=863
- What is the objective of your game: Is it that the main character has to stay alive for 30 seconds by eating certain sprites to get more energy? Is it that you have to collect all of a certain sprite that represents healthy food before you can beat the level? Is it that you have to avoid bad guys and reach the end of a level?
Step 5: Games are created and Published on the GM website (2-3 hours)
Each team of students will implement their plans from Step 4 by designing an actual game. Once the game is finished they will publish it on the Gamestar Mechanic website.
Section 4: Green Ribbon Schools - let the world see it!
Step 1: If not completed in Section 1 of this Lesson Plan, Teacher must register on GRS and Start the Healthivores Project. (5-10 minutes)
If the teacher has not yet registered on the Green Ribbon Schools website or Started the Healthivores Project on GRS, you must visit Section 1: Step 2 and Step 3 before continuing to Section 4: Step 2.
Step 2: Students will now register on the GRS website and join the Healthivores Project started by the teacher. (0-1 hour)
This is a private project and no one can see it unless you invite him or her in. To invite students into the project:
- Login to the GRS site and click on the name of your Healthivores project on your MY PROJECTS page
- Once inside the Healthivores Project you started, locate the PROJECT MEMBERS widget on the right side of the page:
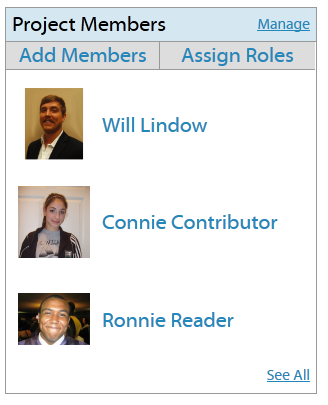
- Click on the ADD MEMBERS button in this widget and the ADD MEMBERS pop up will appear:
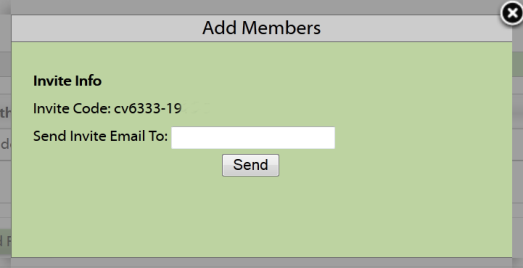
- Email, text, IM, or write the INVITE CODE for this project on the board for the students. Students will login to the GRS website and enter that Invite Code into the JOIN PROJECT box on their MY PROJECTS page:

Step 3: Students Create Results pages on GRS and Submit to Teacher (1-2 hours) - CREATE RESULTS PAGES - HOW TO VIDEO
THIS IS THE BIG FINISH: At this step students will build their "presentation page" or RESULTS PAGE to show off what they learned and to display/Embed their game. Here is the process they should follow:
- Have students download or create/take images and video that represent the healthy lessons they want to teach with their games (right now they are just saving these to their computers and will insert these images/videos into their results page in a couple steps.
- Have students Log In to the www.greenribbonschools.org website and click on the Healthivores project listed on their My Projects page.
- Once inside the project on the Project's Dashboard page, you and the students will see a big open blank with a toolbar labeled "RESULTS PAGE BUILDER". This is where the presentation or RESULTS PAGE is created. Have them enter a fun and creative title for their Healthivores Results Page and then have them click into the big blank.
- Then have students insert their pictures and/or videos by clicking on the INSERT IMAGE and INSERT VIDEO buttons in the toolbar.
- Students will go to the Gamestar Mechanic website and locate their published game in the GAME ALLEY. Next to their game you will see the SHARE THIS GAME! section. Click on the EMBED button and copy the entire code (the EMBED code is extremely long so be sure to copy the entire thing).
- Go back to the Green Ribbon Schools website and click into the big Results Builder blank. Then click on the INSERT GAME button. In the pop up, Paste the Embed code you just copied from Gamestar into the blank and click the "SAVE and RETURN TO BUILDER" button.
- You will see a big grey box appear where the game has been inserted. DO NOT resize or move this box now that it has been inserted.
- Have students enter all required text from the SUBMISSION CHECKLIST including:
- The story or narrative behind the game: (example: Super Antioxidant Man wants to eliminate all of the free radicals in the human body. So he is put inside of a sick person's body to get rid of them all and collect all the antioxidants)
- The objective or goal of the game (examples: stay alive for x amount of time, get to the end goal by avoiding the bad guys, collect all of the apples in the level)
- The healthy eating, exercising and/or lifestyle choice lesson being taught with the game (foods that are high in sugar can turn into fat, antioxidants eliminate free radicals in the body and keep you healthy, exercising burns calories and makes you a smarter student, etc)
- The intended audience for the game (examples: other students, parents, everyone, etc)
- Team Members: List the First Names of all Team Members who worked on this Game and GRS Results Page.
- Then have students insert their pictures and/or videos by clicking on the INSERT IMAGE and INSERT VIDEO buttons in the toolbar.
- Have the student review for spelling errors and final looks and then click the PUBLISH PAGE button.
HEALTHIVORES SUBMISSION WALKTHROUGH - How To Video
Step 4: Teacher Reviews and Publishes Results pages (1 hour) - PUBLISH RESULTS - How To Video
Students have now submitted their pages to you (the teacher) and you must now PUBLISH them to make them a completed submission and to send them to the PUBLISHED PROJECTS area of the GRS website for everyone in the world to see. Here is how to PUBLISH:
- Login and click on the Healthivores Project you started.
- Locate the PROJECT PAGES widget on the page and click the Green Publish button. This will show you the most Recently Submitted and Published Pages from your project (see image below):
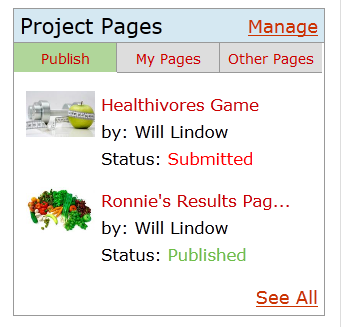
- Click the See All link in the widget to bring up the PROJECT PAGES pop up, where you can see all of the pages currently submitted and or published for this project (see image below):

- Click on the name of any Submitted page to Preview it and to make sure the student has completed all requirements stated on the SUBMISSION CHECKLIST.
- Click the PUBLISH button in the ACTIONS column for each page you want to Publish (making it a completed contest submission). The entire line will turn Green and that page is now PUBLISHED.
YOU ARE DONE! (once you Publish the Results page(s) including all of the requirements from the SUBMISSION CHECKLIST, the submission(s) is complete)
You can now locate your published work on the PARTICIPATING SCHOOLS page of the GRS site by visiting: http://greenribbonschools.org/schools.php, clicking on your school's name in the list and then the name of your Healthivores project. You can also search for it using the PUBLISHED PROJECTS area of the site: http://greenribbonschools.org/publishedprojects.php.
HOW TO VIDEOS - How to Complete these Steps

Acknowledgements: Special thanks to the following for their efforts in developing this Lesson Plan: the AMD Foundation, Pflugerville Independent School District, and Cyberways and Waterways, a non-profit 501-c3, developing Green Ribbon Schools℠.


